


Panels are sold by the bag with 8 panels per bag. One bag covers 64 sq ft. To determine how many bags you need, divide your total square footage by 64.
SCROLL DOWN FOR PICTURES AND DETAILS
Radiant Floor Heat Panel Specification Chart
Below is a chart to show the different sizes and thicknesses available. Take a look at the other insulated floor panel sizes and choose the right one for your project today.
Note: A minimum of 1.5" of concrete pour is required to cover the panels.
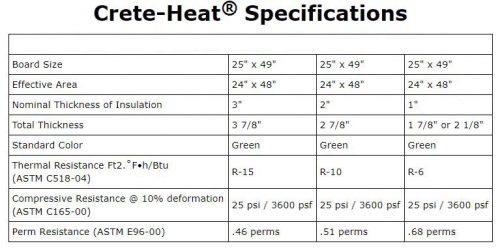
2" Panel Specifications
- Thickness: 2-7/8" overall
- Insulation is 2" thick, the knobs add 7/8"
- Insulated Rating of R-10
- Vapor barrier part of the panel: 10-mil polystyrene film
- Board measures 25" x 49" - effective area is 24" x 48"
- UV-Protected Packaging for outdoor storage
- Installation is quick and easy -see pictures of an installation below
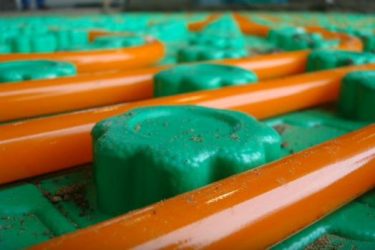
- Built-in knobs hold tubing securely, and the panels are interlocking
- 40 PSI is only for garages with very heavy equipment, like fully loaded semis
- 25 PSI for standard driveway use for cars, etc.
Crete Heat-Insulated Floor Panels Benefits
Installing radiant floor heating without floor insulation panels is simply not an option, as it would lead to extreme heat loss into the ground. The insulated floor panels, known for their easy assembly, exceptional insulation capabilities, and a 10-mil polystyrene film vapor barrier, are essential for preserving and directing heat to the slab so it may radiate to the living space above.
Radiant Floor Heat finds widespread use in basements, garages, and main floor slabs on and above grade, typically in areas where concrete or gypcrete is commonly employed. The insulating features of these panels effectively prevent the dissipation of heat into the ground, ensuring optimal heating efficiency.
Below are some of the benefits that are realized when using the panels:
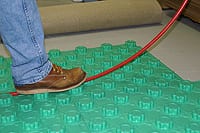
No more bending over, tying, or stapling the PEX into styrofoam boards!
Experience convenience like never before with our Crete Heat-Insulated Floor Panels. Bid farewell to the hassle of bending over, tying, or stapling PEX tubing into styrofoam boards. Our innovative design eliminates the need for tedious manual work, providing a seamless and efficient installation process. Simply press the PEX into place with your foot in the desired design, and it'll be held securely in place throughout the concrete pour.
HEAT AND MONEY SAVING PROPERTIES:
There are tremendous heat and money-saving benefits realized with the use of Crete Heat-Insulated Floor Panels. These panels are engineered and designed to ensure that the warmth generated through the PEX is efficiently transferred to the space being heated. They provide a cozy atmosphere of radiating heat while reducing energy consumption, translating into long-term cost savings on your heating bills.
BUILT-IN VAPOR BARRIER:
The panels come with a built-in vapor barrier. This feature acts as a protective shield, preventing moisture infiltration and safeguarding the integrity of your flooring. Enjoy peace of mind knowing that your heating system is well-protected against potential damage caused by unwanted moisture.
LABOR SAVINGS - NO VISQUEEN OR STAPLES REQUIRED:
Streamline your installation process and save on labor costs. Say goodbye to the need for Visqueen and staples—our panels are designed for easy and efficient installation, eliminating the extra steps and expenses associated with traditional methods of laying down a separate vapor barrier.
UNIFORM HEAT DISTRIBUTION:
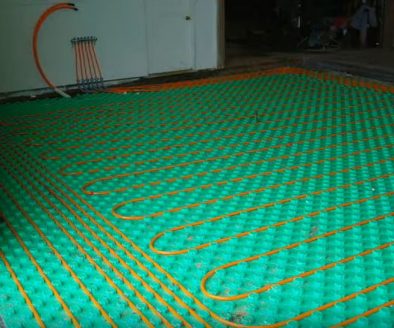
The panels are designed to evenly disperse warmth across your entire floor space with =precise placement and patterns of PEX. Each panel has upright knobs that hold the tubing securely in place, and the grid that it forms allows for exact placement of the PEX. The uniform spacing that the grids create allows for even spacing and accurate designs to put the heat right where you want it. Eliminate cold spots and ensure that every corner of your room receives the same level of comfort with the tubing symmetrically placed where your design calls for it.
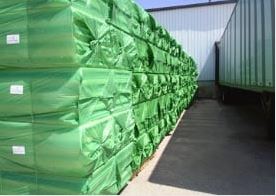
Shipping and Packaging:
The 2" thick panels ship in 30-pound, 2' x 4' waterproof plastic bags, up to (8) bags on a single pallet as shown below. See the picture below to see how the panels will arrive upon delivery.
Crete-Heat Floor Panel Installation Video
How to Install Crete-Heat Insulated Floor Panels and PEX Tubing
The panels are easily assembled and provide a vapor barrier of 10-mil polystyrene film and very high insulation properties for a very efficient and economical radiant heating system for almost any application. They are available in 1 or 2-inch thicknesses of solid and continuous EPS foam insulation for ratings of R-6 and R-10. Each interlocking panel measures 2’ x 4’ to cover 8 ft.² of flooring. They do not require staples or fasteners to secure the PEX tubing, and the raised knobs provide a simple and effective means of keeping the tubing where desired.
The panels are shipped in UV-protected bags and are easy to move and store. Easy to cut and modify for irregular floor sizes and shapes, there are tremendous labor savings with no taping or stapling and simple installation that provides for minimal waste.
Simply put, the insulated floor panel system provides economical radiant heat for your entire floor!
Leveling Radiant Floor Panels
Many different types of material may be used as a sub-floor foundation for the radiant heat panels: crushed limestone, sand, and gravel, to name a few. Although many of these may be used and are the easiest to level and work with during installation. Although the panels are designed to attach, one of the benefits of the lip connection design is to secure the panels so that they can “float” independently of each other. This minimizes bending or cracking due to an uneven surface. It’s best if your fill is as close to level as possible, but the panels can accommodate some unevenness.Starting your grid
For the very first panel, you’ll want to remove the interlocking lip from the 4-foot dimension, so you have a snug fit against the ‘starter’ wall. This will alleviate any air gaps and provide the best insulating and radiant heat properties along the wall. You’ll need to do this for each of the panels that will run against the wall to provide a secure fit for the entire length. After this first row is established, simply lay the new panel interlocking edges along the row and continue until your floor is covered. You may need to cut the final panel to fit in place and complete the installation.Cutting the panels
The panels are very easily cut by scoring the top of the panel at the length needed and then flipping it so the foam side faces up. You may then gently tap the panel on the ground, and it will break along the score line. If more precise or intricate designs and cuts are called for, a keyhole saw will make quick work of it. One of the best installation tips is to be sure to stagger the joints where the panels come together to avoid common seams. This will help increase stability and avoid any potential and unnecessary flexing or leaking of the insulating properties. The panels are constructed in 3-inch connected squares, and each square alternates between a flat area and a knob. This pattern of flat-knob-flat-know must be kept as a consistent pattern throughout your so the PEX tubing is uniformly held in place. If the pattern does become interrupted, simply cut three more inches off of a panel, and it will get the sequence back in proper order.Installing PEX Tubing in the Radiant Floor Panel Grid
Insulation and Vapor Barrier
Simplified Tubing Placement
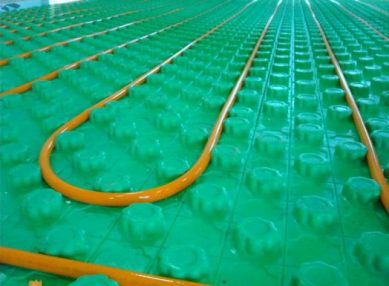
The integrated raised knobs on each panel allow for a convenient, uniform, and secure means of creating your desired heating pattern. Not only does it create even spacing between your tubing, but it also holds it firmly in place when walking on, using a wheelbarrow over, and pouring the cement on top. The labor savings of this feature cannot be overstated!
Features
- 3" On Center Fasteners Allow For Quick Tubing Installation
- 2" in Green Bags - (64 square feet per bag)
- 1" in Black Bags - (96 square feet per bag)
- Shipped 8 Bags per pallet
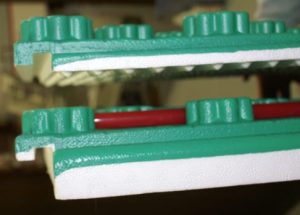
The panels are notched on the ends so they overlap and are secured to each other when placed on the floor. The notches and the thickness of the 1" and 2" panels are shown in the picture below.
Sample Installation
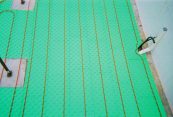
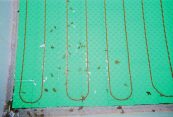
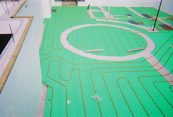
Pictures of a recent Insulated Floor Panel Installation
After laying out the panels in their tongue and groove pattern, the PEX tubing is installed by setting it between the raised knobs. This is a great time and labor saver as you can simply step on the tubing to put it in place, and it stays put. You can walk on the knobs, and the tubing won't move when cement is poured over the top.
Crete Heat Installation Pictures


Pouring cement on the floor panels
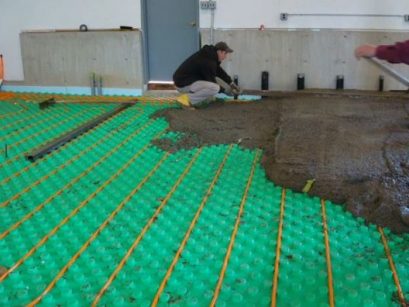
The result is a warm slab or flooring, depending on use, and trouble-free, quiet, and efficient heating for years to come!