


Description
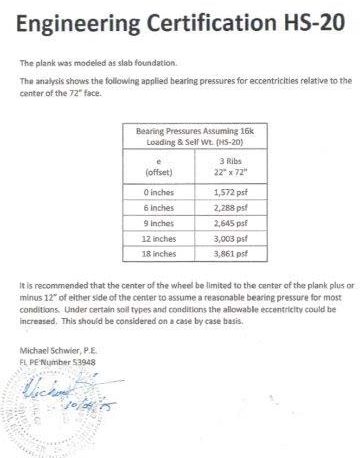
A reusable concrete cattle guard form lets you cast multiple concrete cattle guard sections on site. This page describes the reusable mold, which is removed after the concrete has gained sufficient strength. The manufacturer provides HS-20 engineering documentation; the finished crossing must follow the applicable reinforcement, concrete, support, layout, and installation requirements. A load rating does not provide blanket approval for every road or vehicle.

The reusable mold weighs approximately 80 pounds. Finished sections are placed on a prepared, compacted base with drainage appropriate to the site. The solid-bottom groove design limits the open space below the ridges, but does not guarantee protection against hoof injury or entrapment.
The reusable form can reduce the need to ship multiple finished cattle guard sections. Concrete, reinforcement, lifting equipment, site preparation, and installation are still required for each crossing.

Concrete Cattle Guard Specifications
- Reusable mold for casting multiple concrete sections
- Reusable mold weight: approximately 80 lbs.; finished concrete section weight depends on the pour
- Make as many as you like!
- Be sure to use a release agent to avoid damage to the form
- Finished dimensions are approximately 6' L x 21.5" W
- HS-20 engineering documentation available; follow the specified concrete, reinforcement, and installation requirements. Rebar not included
- Each pour requires 12 bags of 80 lbs., 4,000 PSI concrete mix, and 1/2" rebar
How to make your own cattle guard!
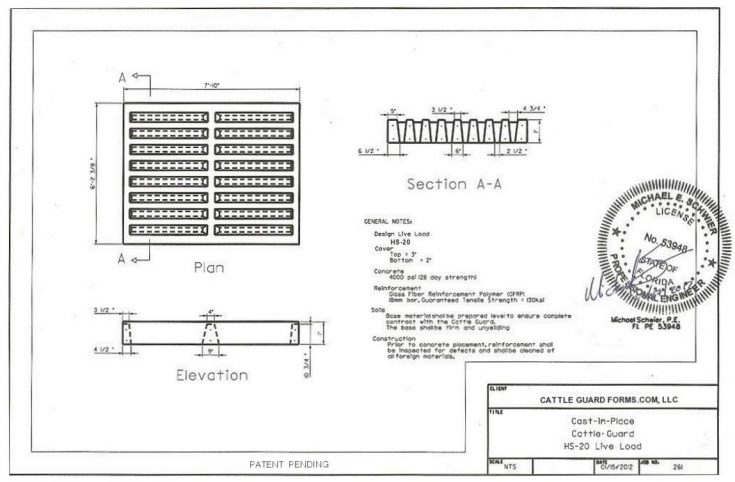
Use the manufacturer's current engineering documentation to plan an HS-20-rated installation. Concrete strength, reinforcement placement, curing, base support, and crossing layout must meet the applicable requirements. Confirm project acceptance with the responsible authority where required.
Cattle Guard Spacing
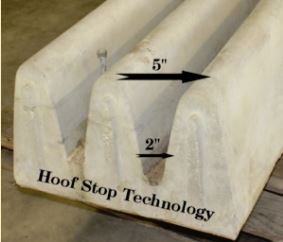
Use a Release Agent
To help the finished form exit the mold, it is recommended to use non-petroleum release agents, like vegetable oil, Pam, or car wax. Since the form is made of polyethylene (plastic), certain release agents that are petroleum-based react with the plastic and can damage the form. A non-petroleum-based agent should be used to ensure a smooth release and avoid damage to the form while separating it from the finished cattle guard.
Finished Concrete Cattle Guard
EACH POUR REQUIRES 12 BAGS / 80 LB. / 4,000 PSI CONCRETE MIX & 1/2" RE-BAR
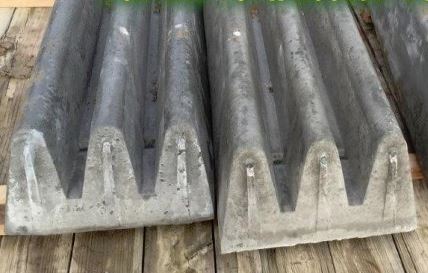
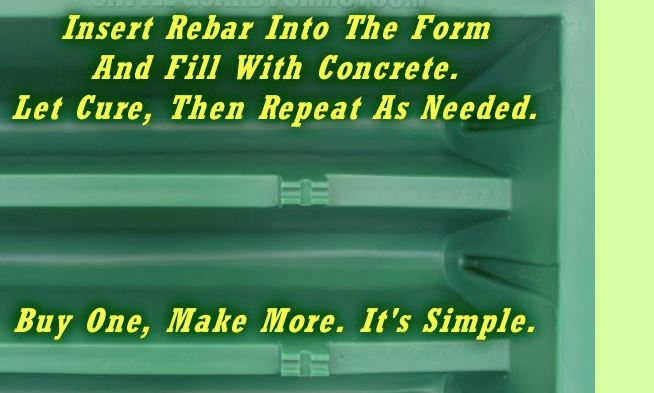
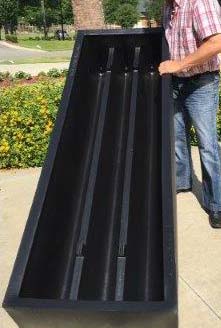
Inside the form
The video below gives valuable insight into how to pour your own cattle guards from an actual job. It has fantastic real-time comments from the owner of the company and plenty of tips on how to easily make your own livestock barriers. Learn how easy it is, from start to finish, as you watch how it's done simply and easily!
Please see more videos at the bottom of the page for a complete overview of the entire process. Here's a link for the larger leave-in-the-ground concrete cattle guard form, and one in case you need a steel cattle guard.
Using the Cattle Guard Form
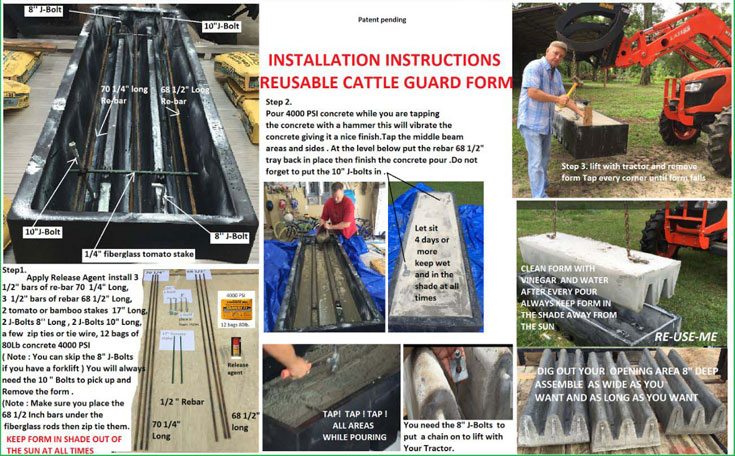
The reusable form includes notches to position reinforcement before pouring. Follow the manufacturer's reinforcement plan and installation instructions rather than changing bar size or placement without approval. Curing requirements differ for removing the mold, lifting a section, and allowing vehicle traffic.
- Install the Re-bar: Slide your re-bar into the holding slots at the top and bottom of the form. Use 1/2" rebar positioned according to the manufacturer’s reinforcement plan
- Tie in a J-bolt or other lifting point to remove the guard when cured
- Apply a release agent to the form to help the concrete exit the form when cured. Silicon-based and even plain vegetable oil work well.
- Fill the form with cement - each form takes 12, 80-pound bags of 4,000 psi cement
- Let the cement cure - the manufacturer lists typical mold removal at 48–72 hours, depending on conditions. This is not the same as readiness for traffic; allow the specified strength to develop, with a 28-day target before heavy vehicle use
- Lift the guard and tap around the perimeter of the form to remove
- Set your new concrete livestock barrier in place
After suitable mold removal and cleaning, the reusable form can be used for another pour. Follow the manufacturer's engineering and installation documentation for each finished crossing; the rating depends on the completed installation.
Video on how to make your own cattle guard!
Making and Installing Concrete Sections
The reusable mold allows multiple concrete cattle guard sections to be cast on site. Each pour requires concrete, reinforcement, lifting hardware, and suitable handling equipment. The sections must be cured and installed according to the manufacturer's instructions.
Ease of Making
Prepare the mold with a compatible release agent and position the reinforcement and lifting hardware according to the manufacturer's plan. Place and consolidate the specified concrete mix, then allow it to develop sufficient strength before lifting or removing the mold.

Ease of Installation
Prepare a level, compacted base and provide drainage suitable for the location. Plan the crossing width, section layout, lifting access, and roadway approaches before placing the finished concrete sections.
Convenience of Making Multiple Forms
The CowStop form is reusable, allowing additional sections to be cast without purchasing another mold for every pour. Concrete, reinforcement, labor, and handling costs still apply to each section.
The reusable approach can suit farms and ranches planning multiple crossings. Compare the complete material, installation, equipment, and freight costs for your site before selecting a system.
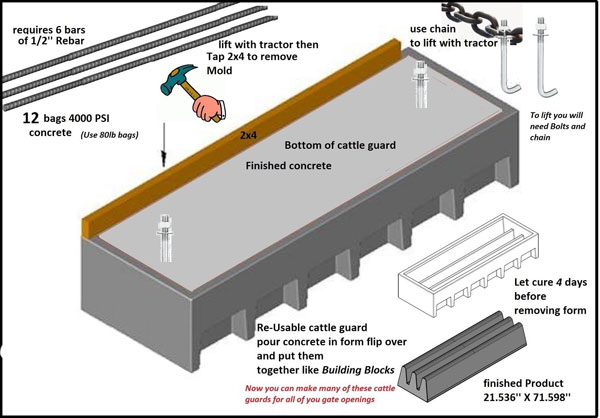
Diagram of cattle guard form
Advantages of Concrete Cattle Guard Forms
The most obvious is the cost! The form is reusable, and you can pour as many as you'd like to build in a do-it-yourself system.
Livestock Suitability
Cattle guards are intended for cattle containment. Do not assume this concrete design is suitable for horses or smaller-hoofed animals; use an appropriate gate or other containment arrangement where needed.
The grooves have a solid bottom rather than an open vault beneath the crossing. This design does not eliminate the risk of hoof injury or entrapment. Confirm the current dimensions and suitability for the livestock involved before installation.
Reusable cattle Guard Forms allow you to make as many as you'd like
When using a form, you can make as many as you'd like. If you have multiple openings you'd like to prevent your livestock from crossing and don't want to worry about opening and closing gates, simply pour another cattle guard! No need to have multiple grids shipped to you when you can make your own. Most steel cattle guards will weigh 120 - 130 pounds per linear foot, making them difficult and expensive to ship.
Steel and concrete cattle guards have different installation requirements. Confirm the specified support, foundation or base, drainage, and approach grading for the exact product being installed.
Containment performance depends on the finished crossing layout, surrounding fencing, maintenance, and animal behavior. Follow the manufacturer's layout guidance rather than relying on improvised spacing or unsupported design assumptions.
Use the manufacturer's engineered layout and reinforcement details for this reusable form. Avoid applying general height or gap rules from a different cattle guard design.
Material choice involves maintenance, handling, and site conditions. Compare the documented requirements for each product rather than assuming concrete is always stronger, longer-lasting, or less expensive than steel.
A reusable form can reduce repeat mold purchases and freight for finished sections; total project cost depends on the site and installation.

This reusable mold weighs approximately 80 pounds and is removed from the cured concrete section for reuse. Larger leave-in-place forms are different products with their own dimensions, reinforcement, weights, and installation instructions.
For this reusable model, pour the section in the mold, allow sufficient strength to develop, remove the mold, and place the finished section on its prepared base. Follow the manufacturer's HS-20 engineering documentation for the complete installation.
An HS-20 designation describes a design loading configuration; it is not a guarantee that every vehicle or gross vehicle weight is acceptable. Have the applicable engineering documentation reviewed for the intended traffic and project requirements.
Here's what the form looks like, full of cement and waiting to cure. Notice the rebar added to make lifting the finished guard easier to remove the form.

We spoke with the manufacturer, and they recommended using any non-petroleum release agents, like vegetable oil, Pam, or car wax. Since the form is made of polyethylene (plastic), certain release agents that are petroleum-based can react with the plastic and damage the form.
This quick illustrated construction diagram shows how straightforward it is to make your own concrete cattle guards:
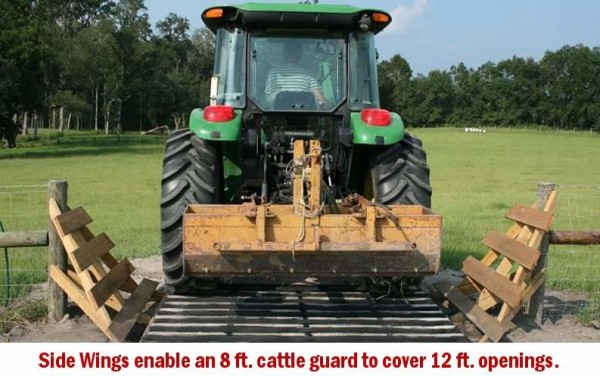
Here, a typical farm tractor crosses the concrete cattle grid and enters another pasture for mowing. No one had to get out and open a gate or fend off any cows!!
How To Make Your Own Cattle Guard
Concrete Cattle Guard Form Video Review
Built My Own Cattle Crossings and Saved a Ton
I’ve been running cattle for years, and when it came time to put in more cattle crossings, I started pricing out steel cattle guards. Let me tell you, by the time you add shipping to get one of those large, heavy suckers delivered way out here, it just ain’t worth it. That’s when I came across this reusable cattle guard form from Barn World, and I’m sure glad I did.
This thing is tough, well-built, and easy to work with. I poured my guards using the form, and it worked just like they said it would. I sprayed the inside of the form all over it before the pour, and once that concrete cured up, the form came off smooth as butter. No sticking, no cracks—just a solid cattle guard ready to go in the ground. I poured 12 in all for 2 crossings total.
One of the best parts is how many times I can use this form. I’ve already used it to make two separate crossings on different parts of the property. I plan to make a couple more before the summer's out. It’s a huge money-saver compared to buying separate steel guards every time. I figure I’ve saved a few thousand bucks easy—not just on the guards themselves, but also all that expensive shipping that comes with them.
The form is simple to set up, even for someone like me who ain’t a concrete expert. Just get yourself a good flat spot, follow the instructions, and pour. This setup is perfect for rural folks who want to get the job done themselves without needing to bring in a bunch of outside help.
It’s been holding up strong. I drive over it daily, and I’m impressed with how they're doing. Cows won't go near them, and I used crushed gravel for drainage. They haven't moved since I put them in. The form is a great investment for anyone who needs multiple crossings but doesn’t want to throw money away on steel or deal with the hassle of delivery out to remote areas.
Bottom line: it’s cost-effective, easy to use, and gives you the satisfaction of a job well done. I’d recommend it to any rancher who wants to keep cattle moving safely without breaking the bank.
John P - South Dakota